- Home
- About us
- Products
- Animatronic Dinosaurs
-
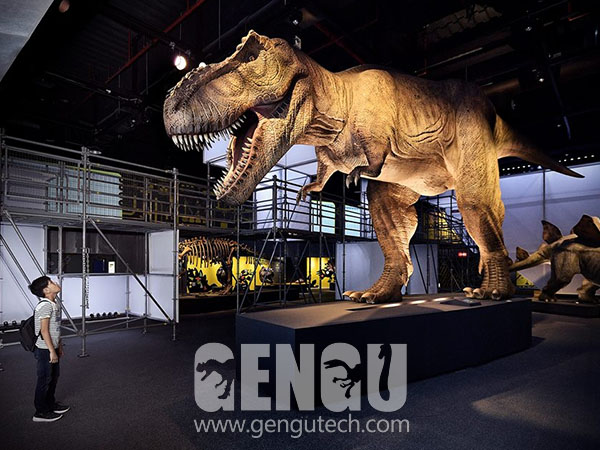
Animatronic Dinosaur is the use of cable-pulled devices or motors to emulate a dinosaur, or bring lifelike characteristics to an otherwise inanimate object. Animatronic figures are often powered by pneumatics, hydraulics, motors and by electrical means, and can be implemented using both computer control and human control.
Motion actuators are often used to imitate muscle movements and create realistic motions in limbs with imaginary dinosaur sounds. Gengu Dinosaurs are covered with body shells and flexible skins made of hard and soft foam and silicone materials and finished with details like colors, hair and feathers and other components to make the dinosaur more lifelike.
We are a animatronic dinosaurs manufacturers, which have a whole set of quality management system. With 17 years of experience in this industry, we have rich experience and our brand is also very well-known in the industry. If you are interested in our products, please feel free to contact us.
Applications
The simulation of dinosaurs is to use modern scientific and technological means to create realistic, active and barking dinosaurs based on computer restoration pictures of dinosaur fossils, which has a strong attraction for tourists. With these unique big guys, you can create a dinosaur theme park that will make you linger and forget to return.
1. Tourist attractions
2. Dinosaur theme park
3. Amusement Park
4. Shopping Center
5. Museums
6. Real estate promotion
Do you want to choose the best animatronic dinosaurs manufacturers?
1. We design the machinery for each dinosaur to ensure their air circulation and frictionless operation. So animatronic dinosaurs can have a long life.
2. We can design dinosaur posture and color according to your requirements.
3. As long as you provide photos and plans, we can also give you a dinosaur exhibition.
4. We also provide program design, dinosaur information design, Dinosaur realistic design, advertising design, etc.
If you are interested in our animatronic dinosaurs, we would be happy to have your specific requirements. We will try our best to meet your requirements.
-
- Dinosaur Costumes
-
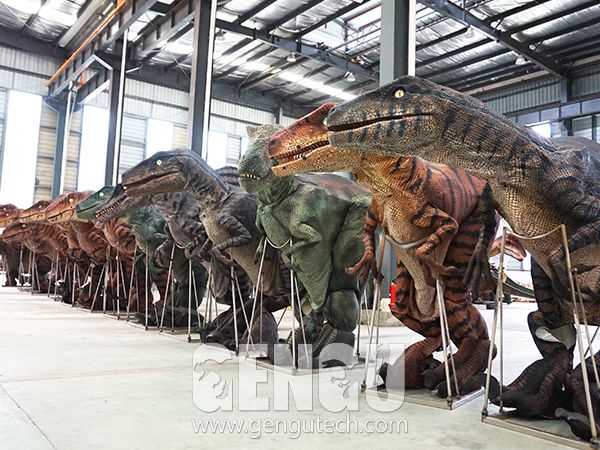
Our Advantages of Adult Realistic Dinosaur Costume
1. Light weight: It is an improved frame structure with completely different skin materials, making the weight at least 10kg lighter.
2. Flexibility: head movements are more vivid and flexible. Performers can wear longer than before and interact more with the audience.
3. Vivid color: The skin made of new materials can be designed and processed manually to be more realistic and vivid.
4. More functions: The new dinosaur clothing has two additional functions: water spray and smoke spray.
5. Advanced materials: skin will be more durable, breathable, environmentally friendly, and free from any odor.
Customized Service of Realistic Dinosaur Costume
1. Materials: stainless steel (newly improved structure, lightweight and flexible), high-tech lightweight composite materials (customized materials, lightweight and environment-friendly, making the skin more lifelike and odor free)
2. Sound: There are five different roaring and breathing sounds, which can be changed according to different performance.
3. Movement: The eyes blink automatically, the mouth opens and closes synchronously with the sound, the head moves flexibly (nods, swings, looks up and down - from left to right, etc.), and the tail swings when running and walking.
4. Additional functions: water spray and smoke spray.
5. Type: Hidden leg or not.
6. Net weight: 18 kg. Gross weight (including wooden case): about 100kg
7. Size: The length is 4m to 5m, and the height of clothing can be customized from 1.7m to 2.2m according to the performer's height (1.65m to 2.1m).
8. Color: Any customized color is acceptable.
Application of Realistic Dinosaur Costume
Attractions and decorations of outdoor or indoor parks, museums, movie centers, city squares, shopping centers.
Do You Want to Wholesale the Best Adult Realistic Dinosaur Costume?
Adult Realistic Dinosaur Costume is one of our most popular products. We are constantly strengthening the cooperation with many importers and distributors around the world and look forward to your joining.
If you have any questions on Adult Realistic Dinosaur Costume, Dinosaur Cosplay Costume, and Dinosaur Costume, we will give professional answers to your questions. -

Finding here details of Gengu Dinosaurs selling Adult Realistic Silicon Rubber Animatronic Dinosaur Costume Dinosaur Costume. All the jurassic Park Dinosaur Costume with super quality and competitive price.
Advantages of Silicon Rubber Animatronic Dinosaur Costume
1. High quality raw materials
We always use high-quality raw materials in dinosaur production. High glass galvanized iron is used as its inner frame, high-quality DC motor is used as its core power supply, high-density flame-retardant sponge is used as its main material, and high-grade silicone rubber is used as its shell, which guarantees the quality of products from the source.
2. All products are handmade
All products are handmade to make them have special value in the world.
3. Develop technology and products regularly
R&D personnel regularly improve technology and develop products. They will test all products for 48 hours before packaging.
4. Provide feedback to customers.
Each product needs to be tested and feedback provided to customers.
5. Professional simulated dinosaur producers
The quality inspector will check the quality and sign before packaging and shipping.
Do you want to choose the best silicon rubber animatronic dinosaur costume supplier?
We will provide you with suggestions on product types, sizes, colors, sports, etc., help you build dinosaur parks, amusement parks, game centers, etc., and provide customized services. If you are interested in our products, please contact us! -

Gengu Dinosaurs is one of the leading Realistic T-Rex Costume supplier. Our Dinosaur Cosplay Costume has high quality and competitive price.
-
- Amusement Rides and Dinosaur Rides
Amusement Rides and Dinosaur Rides Dinosaur Rides Walking Dinosaur Rides Slidable Dinosaur Rides Amusement Ride Equipment
-

Dinosaur Rides is a kids’ favorite, it’s fun and affordable entertainment for a birthday party, Jurassic theme exhibition, or festival events at shopping malls. And more, dinosaur rides is one of the best business investment. In the city center plaza let your consumers experience a blast Jurassic adventure with motorized dinosaur scooters. The dinosaur or dragon kiddie rides are easy enough for young children to maneuver and even strong enough to carry the adult dino rider. Our team assures every ride-on electric dinosaur is to the highest of standards, with a better control system. We keep improving our kiddie ride designs are modern and realistic and offer bespoke electric animal rides service for your exclusive theme park game machines, making it so desirable to kids and adults alike.
-

Dinosaur Rides
We offer a wide range of dinosaur rides for sale, including kiddie dinosaur rides and stationary rides. Our rides are designed to provide a unique and exciting experience for visitors of all ages. With their life-like designs and smooth movements, our rides can transport visitors back in time to the prehistoric era, creating a sense of wonder and excitement.
Our kiddie dinosaur rides for sale are designed specifically for younger children. They are safe and easy to operate, with simple controls that allow parents or operators to control the ride's movements. The rides are designed with colorful and friendly dinosaurs, making them visually appealing to children. They are also built with safety in mind, with features such as seat belts and safety harnesses to ensure that children remain secure during the ride.
Our dinosaur stationary rides for sale are perfect for attractions that want to provide a unique and immersive experience for visitors. These rides are stationary, but they simulate the movements and sounds of a real dinosaur, creating a life-like experience for visitors. They can be designed to fit the space and theme of the attraction, and they can be customized to meet the specific needs of the customer.
All of our dinosaur rides for sale are built with quality materials and advanced technology to ensure that they are safe, reliable, and long-lasting. They are easy to operate, with simple controls that allow operators to adjust the speed and movements of the ride. Our rides are also easy to maintain, with a low cost of ownership that makes them a profitable investment for businesses and attractions.
Whether you are looking for kiddie dinosaur rides or stationary rides, we have the perfect solution for your needs. Contact us today to learn more about our dinosaur rides for sale and how they can enhance your attraction or business.
Application
The application of dinosaur rides is wide-ranging and can be utilized in various industries and settings. Here are some examples of how dinosaur rides can be used:
1. Amusement Parks: Dinosaur rides are a popular attraction in amusement parks, providing visitors with a unique and exciting experience. They can be used as kiddie rides or larger, stationary rides that simulate a dinosaur exhibit.
2. Museums and Science Centers: Dinosaur rides can be an interactive and educational addition to museums and science centers. They can provide visitors with an immersive experience that helps them to learn about prehistoric creatures, their habitats, and behaviors.
3. Zoos and Aquariums: Dinosaur rides can be a fun and engaging way to attract visitors to zoos and aquariums. They can be used to create themed exhibits or displays that showcase prehistoric creatures alongside modern-day animals.
4. Shopping Malls and Play Areas: Dinosaur rides can be used as an attraction in shopping malls or play areas for children. They can provide a unique and exciting experience for kids, encouraging repeat visits and word-of-mouth marketing.
5. Film and Television Productions: Dinosaur rides can be utilized in film and television productions as props or as part of a special effects sequence. They can be designed to look realistic and provide a sense of authenticity to the production.
Overall, the application of dinosaur rides is diverse and varied, making them a valuable addition to a range of industries and settings. They can provide entertainment, education, and revenue generation potential, making them a worthwhile investment for many businesses and attractions.
Advantages
1. Using dinosaur rides can offer a range of benefits for businesses and attractions looking to enhance their offerings and provide unique experiences for customers. Here are some advantages of using dinosaur rides:
2. Attractiveness: Dinosaur rides are eye-catching and unique, and they can instantly capture the attention of visitors. Their life-like designs and movements create a sense of wonder and excitement, drawing people in and encouraging them to engage with the exhibit.
3. Educational Value: Dinosaur rides can offer an interactive and immersive learning experience, particularly for children. They can help to educate visitors about the prehistoric era, dinosaur species, and their habitats, providing valuable information in an entertaining and engaging way.
4. Entertainment Value: Dinosaur rides are a fun and entertaining way to engage visitors, particularly for families with young children. They offer a unique experience that is not available in many other places, making them a desirable attraction for a wide range of audiences.
5. Versatility: Dinosaur rides can be designed for both indoor and outdoor use, and they are suitable for a variety of venues, including amusement parks, museums, shopping malls, and more. They can also be customized to fit the space and theme of the attraction, making them a versatile addition to any location.
6. Revenue Generation: Dinosaur rides can be a profitable investment for businesses and attractions. They can attract more visitors, increase revenue through ticket sales and gift shop merchandise, and create a memorable experience that encourages visitors to return in the future.
Overall, dinosaur rides offer a range of benefits for businesses and attractions looking to enhance their offerings and provide a unique experience for their customers. With their life-like designs, educational and entertainment value, versatility, and revenue generation potential, dinosaur rides can be a valuable addition to any attraction.
Welcome to Choose Our Dinosaur Rides!
At Gengu Dinosaurs Technology, we offer a wide range of high-quality dinosaur exhibits, including our popular kiddie dinosaur rides and dinosaur stationary rides for sale.
Our kiddie dinosaur rides are perfect for children and are designed to be both fun and safe. These rides are made with high-quality materials and feature life-like dinosaur designs that are sure to capture the imagination of young riders. Our kiddie dinosaur rides are suitable for both indoor and outdoor use, making them the perfect addition to any amusement park, shopping mall, or children's play area.
For those looking for a more stationary dinosaur experience, we also offer dinosaur stationary rides for sale. These exhibits are life-size and designed to look and feel just like real dinosaurs. Made with top-quality materials and built to last, our stationary dinosaur rides are perfect for museums, theme parks, and other permanent exhibits.
At Gengu Dinosaurs Technology, we pride ourselves on our commitment to customer satisfaction. We offer a wide range of customization options for our dinosaur rides, including personalized designs and layouts to fit any space or theme. Additionally, we offer installation and after-sale services to ensure that our customers are completely satisfied with their purchase.
When it comes to high-quality, life-like dinosaur exhibits, Gengu Dinosaurs Technology is the industry leader. Contact us today to learn more about our kiddie dinosaur rides for sale, dinosaur stationary rides for sale, and other products and services. -

Animatronic Walking Dinosaur Rides for Sale
A walking dinosaur ride is a type of amusement park ride that allows children and adults to ride on the back of an animatronic dinosaur that can move and walk. These animatronic dinosaurs are designed to look and move like real dinosaurs, complete with lifelike movements of the head, arms, legs, and tail. The riders sit on a comfortable seat that is securely attached to the dinosaur's back, and the ride is operated by a trained operator who controls the speed and direction of the dinosaur. Walking dinosaur rides are a popular attraction in amusement parks, theme parks, and other outdoor venues, providing a unique and thrilling experience for visitors.
Advantages
There are several advantages to using a walking dinosaur ride in your amusement park or outdoor venue:
1. Attracts Visitors: Walking dinosaur rides are a unique and thrilling attraction that can attract visitors of all ages. They are sure to draw attention and create a sense of excitement among your visitors.
2. Educational: Walking dinosaur rides can also provide an educational experience for children and adults alike. They offer an opportunity to learn about dinosaurs and prehistoric life in a fun and engaging way.
3. Versatile: Walking dinosaur rides are versatile and can be used in both indoor and outdoor venues. They can also be used for both permanent and temporary displays, making them a cost-effective investment.
4. Customizable: Walking dinosaur rides can be customized to fit your specific needs and requirements. They can be designed to match your theme or venue, and can also be tailored to accommodate different age groups and riders.
5. Safe and Secure: Walking dinosaur rides are designed with safety in mind. They are securely anchored to a sturdy base and feature a comfortable seat for the rider. The ride is easy to operate, with simple controls that allow the operator to adjust the speed and direction of the dinosaur.
Overall, walking dinosaur rides are a fun and exciting attraction that can provide a unique and memorable experience for visitors while also offering educational value. They are versatile, customizable, and safe, making them a great addition to any amusement park or outdoor venue.
Application
Walking dinosaur rides have a wide range of applications, including:
1. Amusement Parks and Theme Parks: Walking dinosaur rides are a popular attraction in amusement parks and theme parks. They can provide a thrilling and unique experience for visitors while also fitting into the park's theme and atmosphere.
2. Zoos and Wildlife Parks: Walking dinosaur rides can also be used in zoos and wildlife parks to educate visitors about prehistoric animals and their behavior. They can also provide a fun and exciting way for visitors to interact with the exhibits.
3. Museums and Science Centers: Walking dinosaur rides can be used in museums and science centers to teach visitors about dinosaurs and prehistoric life. They can also provide a fun and interactive way for visitors to engage with the exhibits.
4. Festivals and Fairs: Walking dinosaur rides can be a great attraction for festivals and fairs, providing a unique and exciting experience for attendees.
5. Special Events and Parties: Walking dinosaur rides can also be rented for special events and parties, providing a fun and memorable experience for guests of all ages.
Overall, walking dinosaur rides have a wide range of applications and can be used in many different settings to provide entertainment and education to visitors.
Our Anchiceratops Walking Ride have the features with highly quality. We will give you best quality and factory price. Welcome to contact us!
Welcome to choose our animatronic walking dinosaur!
Introducing Gengu Dinosaurs Technology's animatronic walking dinosaur ride, the perfect addition to your amusement park, theme park, or any outdoor venue! Our walking dinosaur ride is one of our best-selling products and is sure to delight children and adults alike.
Our animatronic walking dinosaur rides for sale are meticulously crafted by our team of skilled artisans and engineers. The attention to detail is evident in every aspect of our product, from the lifelike movements of the dinosaur to the durable construction that ensures long-lasting use.
Each of our animatronic walking dinosaurs is equipped with advanced technology that allows them to move in a realistic manner. With synchronized movements of the head, arms, legs, and tail, our walking dinosaur ride will transport your visitors back to the prehistoric era.
Our hot sale walking dinosaur rides model for kids is designed with safety in mind. The dinosaur is securely anchored to a sturdy base and features a comfortable seat for the rider. The ride is easy to operate, with simple controls that allow the operator to adjust the speed and direction of the dinosaur.
At Gengu Dinosaurs Technology, we pride ourselves on providing exceptional customer service. We offer customized layout design and build services to ensure that our animatronic walking dinosaur ride fits seamlessly into your venue. Our team will work with you every step of the way, from design to installation, to ensure that your new attraction exceeds your expectations.
In conclusion, if you're looking for a high-quality, animatronic walking dinosaur ride for your amusement park or outdoor venue, look no further than Gengu Dinosaurs Technology. Our hot sale walking dinosaur rides model for kids are a crowd-pleaser and sure to provide a memorable experience for your visitors. Contact us today to learn more about our products and services! -

Slidable Dinosaur Rides
Dinosaur rides for kids are a type of amusement ride that are designed to resemble dinosaurs, allowing kids to ride on them and experience the feeling of riding a prehistoric creature. These rides come in various sizes and shapes, and they are usually operated in amusement parks, children's play areas, or other entertainment venues.
Dinosaur rides for kids typically have a seat that is attached to the back of the dinosaur, and they are controlled by an operator who controls the movements of the ride, such as the speed and direction. Some dinosaur rides may also have additional features, such as sound effects, animatronics, or educational components that teach children about the prehistoric world.
Dinosaur rides for kids can provide a fun and exciting experience for children while encouraging their imagination and curiosity. They can also be a safe and controlled environment for kids to exercise and socialize, making them a popular attraction in many family-oriented entertainment venues.
Features
Here are some general features of using dinosaur rides for kids:
1. Safe and durable construction: Dinosaur rides for kids should be made with high-quality materials that are safe, sturdy, and able to withstand the wear and tear of regular use.
2. Fun and interactive design: The design of the dinosaur ride should be engaging and appealing to kids, with bright colors, interesting features, and interactive components such as sound effects and motion.
3. Easy to use: Dinosaur rides should be easy for kids to use, with simple controls that are intuitive and easy to understand.
4. Adjustable settings: Depending on the age and size of the child, the ride should have adjustable settings for speed, height, and other features to ensure that it is safe and comfortable for them to use.
5. Comfortable seating: The seat should be designed to be comfortable and supportive for the child, with adjustable straps or safety harnesses to ensure their safety while riding.
6. Educational components: Some dinosaur rides may have educational components that teach kids about different types of dinosaurs or prehistoric environments, providing a fun and interactive learning experience.
Overall, the features of dinosaur rides for kids should be designed to provide a safe, engaging, and enjoyable experience that is appropriate for their age and size, while also encouraging their curiosity and imagination.
Advantages
Dinosaur rides can provide a fun and exciting experience for kids, and they may have several advantages, including:
1. Imagination and Creativity: Dinosaur rides can spark a child's imagination and creativity, as they are transported into a prehistoric world of adventure and exploration.
2. Physical activity: Riding a dinosaur requires physical activity, which can be a great way for kids to exercise and develop their motor skills. It can also be an alternative to sedentary activities such as playing video games or watching TV.
3. Socialization: Riding a dinosaur with friends or family can be a social activity, allowing kids to interact with others and form bonds while having fun.
4. Learning: Dinosaur rides can be an opportunity for kids to learn about the prehistoric world and the different species of dinosaurs that once roamed the earth.
5. Safe and controlled environment: Most dinosaur rides are designed to be safe and are operated in a controlled environment. This can provide parents with peace of mind knowing that their children are in a safe and secure setting.
Overall, dinosaur rides can be a fun and enjoyable experience for kids while providing them with opportunities to learn, socialize, and exercise.
Welcome to Choose Our Slidable Dinosaur Rides!
Gengu Dinosaurs Technology is a leading slidable dinosaur rides manufacturer and supplier based in Zigong, China. Our company specializes in creating life-size, life-like static and animatronic exhibits of dinosaurs, animals, dragons, insects, ice age animals, marine life, and customized products.
Our slidable dinosaur rides are one of our most popular products, perfect for amusement parks, theme parks, and other entertainment venues. These rides combine the thrill of a dinosaur ride with the excitement of a slide, making them a unique and unforgettable experience for children and adults alike.
Our slidable dinosaur rides come in a variety of designs, each featuring a different species of dinosaur. Riders can climb up the back of the dinosaur and slide down its tail, experiencing the sensation of riding on a prehistoric beast. Our rides are made with the highest quality materials, ensuring safety and durability for years of use.
As a leading slidable dinosaur rides supplier, we offer a wide range of customization options for our clients. We can create rides to fit any space or theme, from small backyard attractions to large-scale installations. Our expert design team can work with clients to create a customized layout that meets their specific needs and requirements.
Gengu Dinosaurs Technology is committed to providing the best quality products and services to our clients. We offer slidable dinosaur rides for sale at competitive prices, backed by our expert installation and after-sale service. Our goal is to ensure that our customers are completely satisfied with their purchase, and we strive to exceed their expectations in every way.
Choose Gengu Dinosaurs Technology as your slidable dinosaur rides manufacturer and supplier, and experience the thrill and excitement of riding on a prehistoric beast! -

If you want to know more details about high quality Amusement Ride Equipment, please contact us, our Dinosaur Train has been welcomed in international markets.
-
- Fiberglass Products
-

As a China Fiberglass Dinosaur Products manufacturer and exporter, Gengu Dinosaurs has a rich catalog of Fiberglass Products and Customize Fiberglass Products, welcome to contact us!
-

Fiberglass Dinosaurs for Sale
Welcome to Gengu, your trusted supplier of high-quality fiberglass dinosaurs. Our company, Gengu, has been in the business since January 2007, and we take pride in offering a diverse range of life-size, life-like static and animatronic exhibits. With our exceptional craftsmanship and attention to detail, we bring prehistoric creatures back to life, making them a captivating addition to water parks, museums, amusement parks, and more.
Fiberglass Dinosaur
Our fiberglass dinosaur is a stunning replica of one of the most iconic prehistoric creatures to ever roam the earth. Standing at an impressive height, this dinosaur will be the center of attention in any room or outdoor space. The fiberglass material is lightweight, yet durable and resistant to the elements, making it perfect for both indoor and outdoor display. The intricate detailing and realistic coloring make this fiberglass dinosaur look like it's straight out of the Jurassic era. This is the perfect addition to any home, office, or museum exhibit.
Product Features and Functions
1. Impressive life-size representation of the Spinosaurus, capturing its distinctive features and characteristics.
2. Crafted from top-grade fiberglass materials, ensuring longevity and resistance to wear and tear.
3. Realistic movements and animatronic capabilities create an immersive and interactive experience.
4. Suitable for various applications, including water parks, theme parks, educational institutions, and more.
5. Provides a captivating blend of entertainment and education, appealing to visitors of all ages.
Advantages
There are several advantages to using fiberglass to create dinosaur sculptures or models:
1. Durability: Fiberglass is a strong and durable material that can withstand a lot of wear and tear. This makes it ideal for outdoor use, as it can withstand weathering and other external factors.
2. Lightweight: Fiberglass is much lighter than other materials, such as concrete or metal, which makes it easier to transport and install. This is especially useful for large dinosaur sculptures that would be difficult to move otherwise.
3. Customizability: Fiberglass is easy to mold and shape, which allows for a high level of customization in the creation of dinosaur sculptures. This makes it possible to create intricate details and realistic features on the sculpture.
Low maintenance: Fiberglass is resistant to corrosion and requires minimal maintenance, making it a practical choice for outdoor installations.
4. Cost-effective: Compared to other materials, fiberglass is relatively inexpensive, making it a cost-effective choice for large-scale projects.
5. Unparalleled Realism: The attention to detail and meticulous craftsmanship of our Fiberglass Spinosaurus sets it apart, making it appear remarkably lifelike and captivating.
6. Exceptional Durability: Constructed from high-quality fiberglass, this exhibit is built to withstand various weather conditions and heavy visitor traffic, ensuring a long lifespan.
7. Engaging Animatronics: The Spinosaurus can be equipped with advanced animatronic features, allowing it to move realistically, roar, and interact with visitors, creating a truly immersive experience.
8. Versatile Applications: Whether you plan to showcase the Fiberglass Spinosaurus indoors or outdoors, in a permanent installation or a traveling exhibition, it adapts seamlessly to different environments.
Choose Gengu as Your Trusted Fiberglass Dinosaur Supplier
When you partner with Gengu as your fiberglass dinosaur supplier, you gain access to a wide range of benefits and advantages. With our expertise and commitment to excellence, we go beyond merely offering products. Here's why Gengu stands out among the rest:
1. Established Reputation: Since 2007, Gengu has been a trusted name in the industry, known for our exceptional quality and customer satisfaction. Our reputation has earned us recognition both locally and globally.
2. Extensive Product Range: In addition to fiberglass dinosaurs, Gengu offers a diverse collection of life-size static and animatronic exhibits, including animals, dragons, insects, ice age creatures, marine life, and customizable options. We cater to a broad spectrum of client needs and preferences.
3. Worldwide Reach: With our extensive export experience, Gengu has successfully supplied exhibits to over 72 countries and regions worldwide. Our products have been well-received and trusted by clients globally.
4. Tailored Solutions: We understand that each project is unique. Gengu provides customized layout design and build services, ensuring that your fiberglass dinosaur exhibit seamlessly integrates into your chosen setting. We work closely with you to bring your vision to life.
5. End-to-End Services: From design to installation and after-sale support, Gengu offers comprehensive services. Our team of experts assists you throughout the entire process, including technical supervision during the civil construction phase.
6. Superior Quality and Timely Delivery: Gengu maintains strict quality control measures to ensure the highest standards in our products. Additionally, our large-scale production capacity enables us to handle large volume orders while meeting flexible customization requirements and delivering on time.
At Gengu, we take pride in our commitment to customer satisfaction. We combine artistic craftsmanship, cutting-edge technology, and a passion for creating lifelike fiberglass dinosaurs to deliver unparalleled experiences for both you and your visitors.
To explore our exquisite collection of fiberglass dinosaurs for sale, including the Fiberglass Spinosaurus and Fiberglass Ankylosaurus, visit our Fiberglass Dinosaurs page. Let us transport you and your audience back in time to the era of magnificent dinosaurs!
We are your most trusted fiberglass dinosaur supplier! Our company supply Fiberglass Velociraptor, we have a whole set of quality management system. If you have interested in Fiberglass Triceratops, please feel free to contact us. -
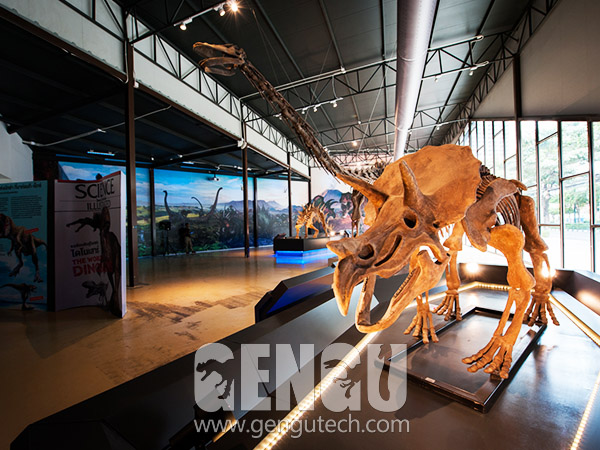
Gengu Dinosaurs can provide China Life Size Dinosaur Skeleton and Replica Dinosaur Fossils, if you have interested in Dino Buried Statue supplier. Welcome to contact us!
-

Finding information here of high quality Fiberglass Dinosaur Door selling companies for your buy requirements. We will offer top quality and wide ranges of Fiberglass Dinosaur Baby for you.
-
- Animatronic Animals
-

Animatronic animals are produced according to the real proportion and features, which combine scientific investigation, advanced animatronic technology and fine artwork. Animatronic animals for sale have the realistic appearance, vivid expression and lifelike movements. We can produce all kinds of animatronic animals, like tiger, leopard, crocodile, elephant, horse, monkey, lion etc. These products are good for attraction and promotion in amusement park, theme park, exhibition, city plaza, museum, shopping mall, and other indoor/outdoor venues. All of our animatronic animals for sale can be customized per your specifications.
Animatronic animals reproduce their usual expressions and actions. Our animatronic animals are also different and lifelike. Gengu was established in January 2007. It has a factory building of 39,800 square meters. So far, Gengu has exported its exhibits to more than 72 countries and regions around the world. We can also provide customized layout design and build services to our clients. Design, installation, and after-sales service are our key services, and customer satisfaction is the core of our service. If you are interested in our products, please contact us!
Characteristic
1. Wide variety.
2. The modeling is smooth, dynamic and lifelike.
3. Our animatronic animals feel comfortable.
4. Own strong resistance to damage and is not easy to break.
5. It is easy to remove ash and can be kept clean for a long time.
We are your most trusted supplier!
We undertake the customization of electromechanical animal models, natural science museums, museums and large animal venues. Pursue excellence and strive for first-class. Adhering to the principle of quality first and customer first, we will wholeheartedly provide our customers with quality services.
As your closest animatronic animals supplier, we have high quality animatronic animals for sale and look forward to your email. Come and contact us! -
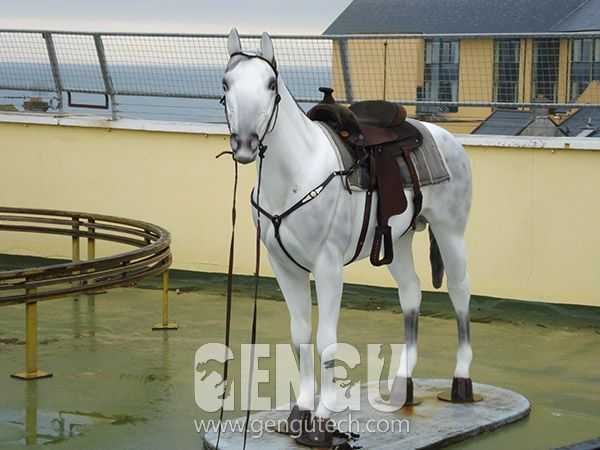
Animatronic animals are produced according to the real proportion and features, which combine scientific investigation, advanced animatronic technology and fine artwork. Animatronic animals have the realistic appearance, vivid expression and lifelike movements. We can produce all kinds of animatronic animals, like tiger, leopard, crocodile, elephant, horse, monkey, lion etc. These products are good for attraction and promotion in amusement park, theme park, exhibition, city plaza, museum, shopping mall, and other indoor/outdoor venues. All of our animatronic animals can be customized per your specifications.
-

Animatronic underwater animals are produced according to the proportion and features, which combine advanced animatronic technology and fine artwork. Animatronic underwater animals have the realistic appearance, vivid expression and lifelike movements. We can produce all kinds of animatronic underwater animals, like shark, whale, otarriinae, penguin, chelonioidea, octopoda etc. And we can customize deep sea monsters as you wish. These products are good for attraction and promotion in amusement park, theme park, exhibition, city plaza, museum, shopping mall, and other indoor/outdoor venues.
-
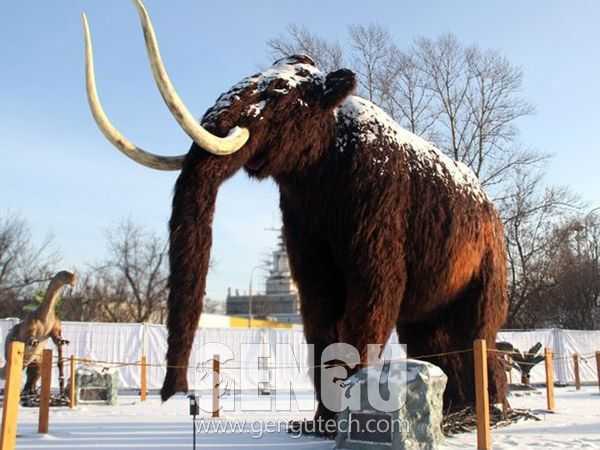
We can bring Ice Age Animals to life too. All of our giant animatronic animals , like Mammoths, Glyptodon, Mastodons, Saber-toothed cat and more, can be customized according to your requirements. Ice Age Animals can be widely used for amusement park, theme park, exhibition, city plaza, museum, shopping mall, and other indoor/outdoor venues.
-
- Animatronic Dragons
-
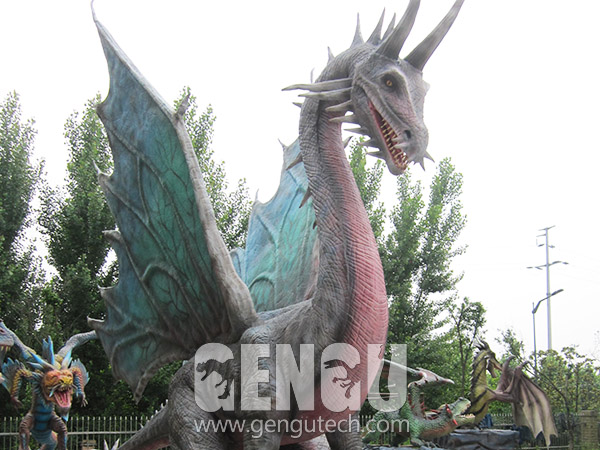
We can produce dragon characters in the movies or in the legendary for you, or you can give us images or some ideas, so we can customize the dragons. The animatronic dragons are highly simulated with various movements, they are very popular in the amusement park, theme park, exhibition, city plaza, museum, shopping mall, and other indoor/outdoor venues.
-
- Animatronic Insects
-
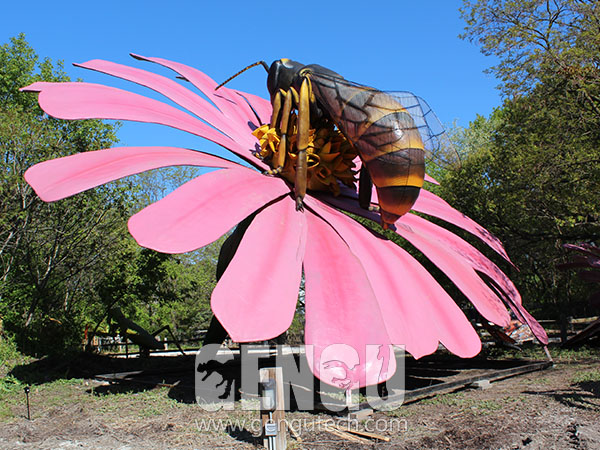
Animatronic Insects
We produce the animatronic insects based on their life-size and external features with advanced technology and fine work. Animatronic insects have realistic appearance, vivid modeling and lifelike movements. Animatronic insects can be a good way for us to get close into insects world, and we can also design and make exaggerated size bugs as you wish. All animatronic insects can be customized according to your specifications, such as size, color, movement, etc.
Advantages
Gengu Dinosaurs Technology is a leading manufacturer of high-quality animatronic insect exhibits. Our animatronic insects are designed and produced with advanced technology and fine craftsmanship, ensuring that they have a realistic appearance, vivid modeling, and lifelike movements that make them an incredible addition to any exhibit or display.
One of the main advantages of our animatronic insects is that they provide an excellent way to get close to the insect world without any of the risks or discomfort associated with live insects. Visitors can see the details of the insect's anatomy, study their movement patterns and behaviors, and gain a greater appreciation of the vital roles they play in our ecosystem.
Another benefit of our animatronic insects is that they can be customized to your specifications, so you can choose the size, color, and movement that best suits your exhibit or display. We can also design and create exaggerated sizes of bugs, making them a fantastic feature for events, trade shows, and theme parks.
Our animatronic insects are made with high-quality materials and are built to withstand the elements, making them ideal for indoor or outdoor use. They are also easy to maintain, and with proper care, they can last for many years, providing long-lasting value for your exhibit or display.
In addition, our animatronic insects are perfect for educational purposes, as they can help teach children and adults alike about the natural world and the importance of insect conservation. They can also be used for entertainment purposes, providing an exciting and memorable experience for visitors.
In conclusion, if you're looking for high-quality animatronic insect exhibits, look no further than Gengu Dinosaurs Technology. Our animatronic insects are customizable, durable, and educational, making them a valuable addition to any exhibit or display.
-
- Talking Trees
- Transformers Models
-
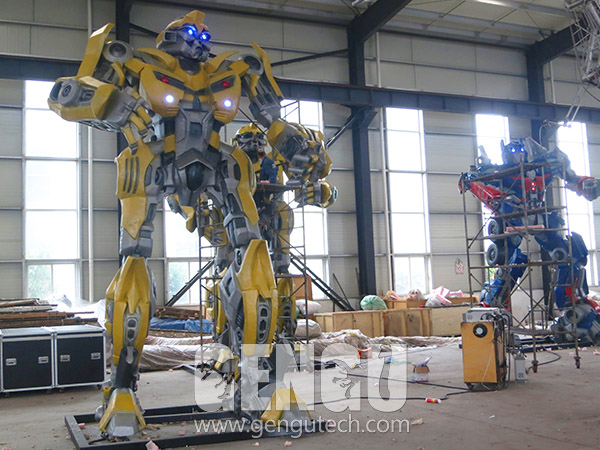
Yes, you didn't read wrong,we are not just bringing dinosaurs to life, the transformers will come to life by the outstanding work of our artists and machinists. They can be displayed in shopping malls, cinemas and amusement parks,etc. No matter kids or adults, it's for sure that people all around the world know and love the Transformers, we are not just making models, we are making happiness and dreams.
-
- Customized Products
-

All customized products are designed and manufactured according to your specifications. As long as you give us the product information, like size, color, movement and other requirements as you wish, we will provide you a vivid and realistic product. Customized products can be divided into fiberglass products and animatronic products. We will recommend more suitable product types according to the customized products.
Our electric products use brushless motors to achieve lifelike appearance and smooth movement. Whether you need dynamic or static models, we can produce them as long as you have ideas or pictures.
Customization process: You provide ideas or pictures - Consider the actual area of your site - Our R&D department determines the materials and model movements - The design department produces construction drawings (3D renderings) - Confirm the renderings - Place an order for production
-
- Ancillary Products
-
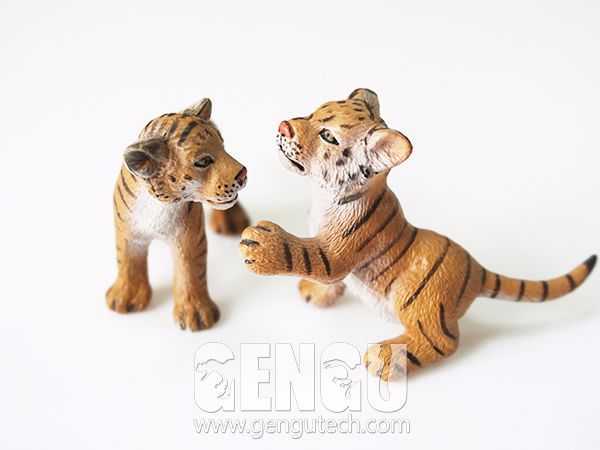
What if the products you purchased is broken after a few years or having some problem, or you just want some additional stuff to make them looks better? Don’t you worry about this, we got you some good ancillary products, including spare parts to do the maintaince work and to replace or repair, LED lights to light up the house, toys and gifts to hand out to kids, and artificial plants to decorate the wall or the land.
-
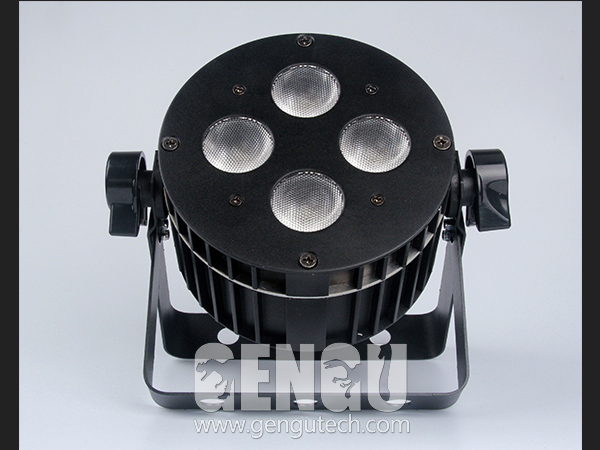
LED lights are ancillary products, not sold separately. The LED lamp housing has an integrated design and optimizes the heat dissipation effect. LED lights have high brightness, low power consumption and high color temperature, but its light is soft and does not make the eyes feel uncomfortable. The external power supply and lamp body are directly fixed together, which makes the product safer, so it is suitable for indoor and outdoor venues.
-
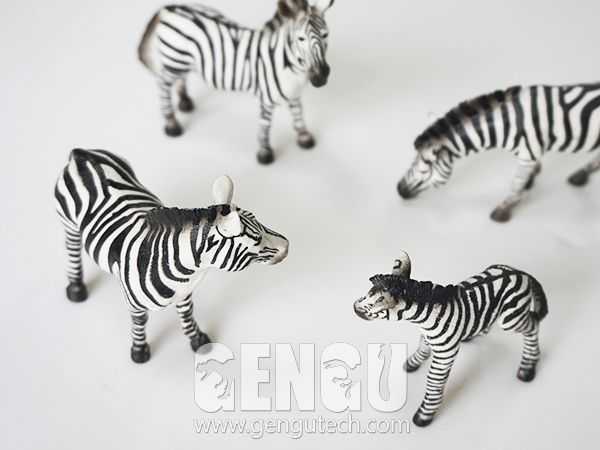
The material of the dinosaur toy is mainly divided into rubber, resin and fiberglass. The rubber toy is relatively soft and colorful, and cartoonish, which is more suitable for children to play. The resin toy is more texture and realistic than the rubber toy, which is more suitable for bigger. children playing. while the fiberglass toy is more suitable for decoration. Our toys contain animals, insects, dinosaurs and more.
-

If you want artificial plants for decoration. We can provide artificial palm trees, artificial coconut tree, Hawaiian palm tree, tropical palm trees, Tahitian coconut palms, tropical plants etc. Artificial plants can decorate all kinds of occasions, like park, hotel, exhibition, city plaza, restaurant, entertainment venues, ecological landscape, shopping mall, garden etc.
-
- Animatronic Dinosaurs
- FEATURES
- Projects
- Blog
- Contact us

How to Make Fiberglass Dinosaurs?
Feb. 24, 2023


Fiberglass dinosaurs are a popular choice for museums, theme parks, and other attractions as they are lightweight, durable, and can be easily molded into any shape or size. Making fiberglass dinosaurs can be a challenging but rewarding process that requires patience, skill, and attention to detail. Here are the steps involved in making fiberglass dinosaurs:
Designing the dinosaur: Before starting the fiberglass dinosaur making process, it is essential to have a clear idea of the dinosaur's design. This includes the size, shape, and pose of the dinosaur, as well as its skin texture and color. You can create a design by using a computer-aided design (CAD) software or by sketching it out on paper.
Creating a scale model: Once you have the design, you will need to create a scale model of the dinosaur. This will help you to identify any potential design flaws and make changes to the design before creating the final fiberglass dinosaur. The scale model can be made using clay, foam, or other materials.
Making the mold: After the scale model is complete, the next step is to create a mold of the dinosaur. This can be done by using a variety of materials, including silicone, plaster, or fiberglass. A fiberglass mold is preferred as it is durable and long-lasting. The mold should be made in sections that can be easily removed to allow for the fiberglass casting.
Preparing the fiberglass: Once the mold is complete, you will need to prepare the fiberglass for casting. This involves cutting fiberglass matting into the appropriate size and shape for the mold. You will also need to mix the resin and catalyst according to the manufacturer's instructions.
Casting the fiberglass: With the fiberglass matting and resin mixture ready, the next step is to start the casting process. The fiberglass matting should be laid in the mold, and the resin mixture should be applied with a brush or roller. It is essential to ensure that the fiberglass is evenly coated and that there are no air bubbles. Once the first layer is complete, additional layers can be added until the desired thickness is achieved.
Removing the fiberglass dinosaur: After the fiberglass has cured, the mold can be opened to reveal the fiberglass dinosaur. The fiberglass should be carefully removed from the mold, taking care not to damage any details or fragile parts. The sections can be joined together using fiberglass resin and matting.
Adding details: Once the fiberglass dinosaur is complete, you can add details such as eyes, teeth, claws, and other features. These can be made using a variety of materials, including resin, clay, and paint.
Painting the dinosaur: Finally, the fiberglass dinosaur can be painted to give it a realistic look. This can be done using acrylic paint, spray paint, or other paint types. It is essential to choose a high-quality paint that will not crack or peel over time.
Tips for Making Fiberglass Dinosaurs:
Use high-quality materials: The quality of the materials you use will have a significant impact on the final product. Choose fiberglass matting, resin, and other materials from a reputable supplier.
Take your time: Making fiberglass dinosaurs is a time-consuming process that requires patience and attention to detail. Rushing through the process can result in mistakes and lower quality work.
Work in a well-ventilated area: Fiberglass resin and catalyst can release harmful fumes, so it is important to work in a well-ventilated area or use a respirator.
Wear protective gear: Fiberglass resin and matting can be itchy and irritating to the skin, so it is essential to wear protective gear such as gloves, goggles, and a long-sleeved shirt.
gengudino
+86-13909009861
15-14 Jinchuan Rd,National high-tech zone, Zigong, Sichuan, China.
Contact Us
Gengu Dinosaurs Technology
Email : gengudino@zggengu.com
Mobile : +86-13909009861
Wechat : gengudino
Whatsapp : +86-13909009861
Add : 15-14 Jinchuan Rd,National high-tech zone, Zigong, Sichuan, China.
Copyright © 2020-2026 Gengu Dinosaurs Technology Co.,Ltd.


